Sunday, 20 December 2009

Paper weaving.

The other set of artwork we did in November was paper weaving which I feel has thrown up some great ideas for quilts - particularly optical illusion quilts.
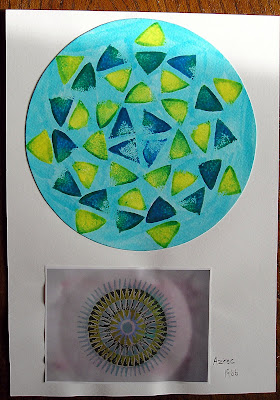
This first sample was weaving inside a shape which was based on one of the shapes from my 1960s plates. I really like the almost 3D effect that you get.

This one is weaving using curved pieces, the black strips are curvy and the coloured strips are straight.
This one is weaving a photo with plain strips.


This one is done using strips of varying widths.

I think that there are lots more ways that I could explore possible quilt designs using weaving as a basis. I have actually got a book on woven quilts coming from Santa and will be making some samples when I have had a good chance to study it.


Friday, 18 December 2009

Image Transfer

In November we had two topics in our Research for Design module. The first of these was Image Transfer including digital image manipulation.
I am going to share some of the artwork out of my folder.
As you will already be aware I love Andy Warhol art and this is my take on it using Jonathan's photo.

Below is the original photo. Details of the software I used are on my other blog.


More image manipulation - I liked the way this one squared up the details on the image which may be useful for patchwork design.


This one took away the colour and gave a pencil sketch effect. I have printed this onto a transfer paper which I am then going to recolour before transferring onto fabric.


The photo of this cat has been transferred onto fabric using white emulsion paint. You paint onto the fabric, place the photo onto it face down, smooth using a roller, allow to dry and then peel off the photo. Works surprisingly well!
I also tried to transfer images using acrylic wax instead of the paint - these were disasters!

A montage in the Andy Warhol style.


Images printed onto brown paper.


Images printed onto hand made paper.


Other methods I used were printing onto lightweight vilene, printing directly onto cotton, and using image transfer crayons. You will see the results of these in the samples I have made which I will show soon.

Monday, 7 December 2009

Last two samples from October.

These are the remaining samples from last month's theme which was using materials which distorted when heated.
The first sample is a montage of some of the techniques I experimented with - what I really mean is that these are the bits I had left over which I didn't want to throw away!

I made a background from watercolour paper coloured with drawing inks which I stitched together to look like a patchwork background. The samples are all machine stitched to the paper background. There are lutradur leaves which are painted but not heated, a tyvek and fibretex sample, a foil sample and a lutradur skeleton leaf sample.
I am quite pleased with the result but it will probably go into my 'Research for Design' file rather than my 'Machine Embroidery' Collection.


The final sample is made using 'teabag foil' which shrivels when it is heated. This is literally the packaging that surrounds some teabags, last year I used foil crisp packets. You have to experiment because not all foil shrivels when it is heated.
It is based on one of my 1960s plates again but I decided to use this printed fabric as a background to experiment with my machine quilting. It was a very useful exercise in quilting in circles and quite enjoyable. It also produced one of my favourite samples!

Saturday, 5 December 2009

Lutradur and Xpandaprint samples.

I am starting to work on this month's samples and have realised that I still have four completed samples to share from last month.
Here are the first two.
This first one is using xpandaprint which is a thick white fluid that you paint onto your fabric and when you heat it it puffs up to give a spongy texture. I decided to try stamping into it with my leaf stamp and this worked very well.
I then painted the leaf and background using acrylic paints, leaving the areas where the stamp had touched the background without any paint.

I then cut around the leaf shape and appliqued it to the background using satin stitch.
The background fabric was decorated using the same stamp, using fabric paints.
Next the background had to be decorated with some more of those wacky machine embroidery stitches. Moss stitch has been worked around the immediate area surrounding the leaf. This is done by producing big loops with the bobbin thread and then removing the top thread to just leave the loops. I then had to iron some vilene onto the back to make sure it didn't all unravel!
Whip stitch is worked in the outer areas, this is another stitch where you can see the bobbin thread on the top but is not as pronounced as whip stitch which I did on the tyvek sample!

I am still not sure whether I like these weird machine stitches but I was pleased to see that Alice Kettle has used them in some of her new work which was on show at The Knitting and Stitching show at Harrogate.

The second sample is made using lutradur leaves. I used the same leaf string print to print leaves onto lutradur. I then cut them out and appliqued them onto this green and yellow four patch block using metallic thread. I also stitched the veins in the leaves. I then free machined in a spiral design in metallic thread - this was a nightmare as the thread kept breaking. The spirals were meant to be much smaller but the thread broke even more if I tried to make them smaller. I then used a heat gun to burn away some of the lutradur - this left a lacy effect which allowed the background to show through which I thought worked well.

Thursday, 26 November 2009

More photos for personal theme.

I was at college last weekend and have shown my work to my tutor. She is really happy with my personal theme but said I needed to show more examples before settling on my area of focus which will be pottery by J&G Meakin.
We have been cleaning today and when washing some of the plates I have on display in the house I decided to photograph them before doing some artwork based on them.


This plate is by Alfred Meakin and I just love the design - I would love to use that as a quilt design.

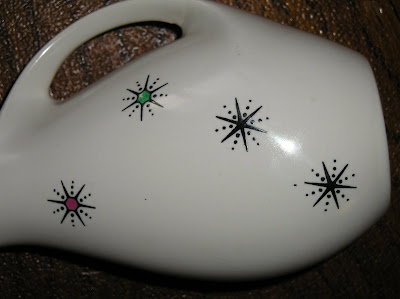
This photo is a closeup of a jug made by Wade. What I loved was the way the coloured stars have a hexagon as their centre. Again, more quilt inspiration here.

And how could I not include one of the most iconic 1960s pottery designs, Homemaker. This is one of my favourites.


I am hoping to use some of these designs as inspiration for artwork and even quilt samples.
I do have four samples completed that I have not shown yet so hope to get them photographed soon.


Wednesday, 18 November 2009

Tyvek, fibretex and kunin felt samples.

The next college weekend is rapidly approaching and I need to get all my samples completed. The theme for this set of samples was to use materials which can be burned, distressed or distorted using heat. Some of them I like and some of them I don't - however it has been valuable to experiment with them and some of them I may incorporate into my quilting.
The six materials we had to investigate were tyvek, fibretex, xpandaprint, kunin felt, lutradur and foil.
We also had to investigate some new machine stitches for embellishment - feather stitch, whip stitch and moss stitch. These mostly involve allowing the bobbin thread to appear on the front of the work - the situation we usually do our best to avoid!!
This first sample is made using tyvek, strips of tyvek were painted and then woven through cotton threads that had been wound onto a picture mount board. Various scraps of fabrics were added and they were all secured with machine stitching. The whole thing was heated causing the tyvek to distort. The piece was then attached to a background fabric and embellished with beads.
A border was added and then it was backed with wadding and calico. The quilting was done with feather stitch which causes loops to appear on the right side.

The second sample was made using fibretex and kunin felt. Three layers of fibretex were each painted a different colour. They were then layered with a layer of navy blue kunin felt on the bottom. The piece was machine stitched using metallic threads in a zig zag design to mirror the triangle in my Aztec plate. This was then heated with a heat gun and the coloured layers and felt backing were reavealed. I then took a square of turquoise hand dyed cotton and a square of lime green kunin felt and attached the heated sample to these using a machine zig zag in a variegated thread. The sample was then layered with wadding and backing and free machine quilted in a meandering design. The lime kunin felt was then heated to give that lacy effect revealing the turquoise background fabric.

The centre piece was then embellished with sequins and beads.
Both samples are the required 10 inches square.

Saturday, 14 November 2009

Collages and Montages!

Still not 100% sure what the difference is between a collage and a montage - but I think that the first two are montages because they contain whole images and the last one is a collage because a new image is made up from using different elements. Sounds impressive anyway!

This first one is my favourite - it is made up of images of my 1960s plates and some of my decorated papers.

In this one I tried to use the leaf shape to showcase the different decorated papers - monoprinting, sponging, using a roller, rubbings and sponge printing.


This is my collage which turned out better than I was expecting although I still can't decide which way up looks best! I coloured in the central rubbed sample to try to give the piece a focal point.
I am now working on my stitched samples which I hope to show soon.

Thursday, 12 November 2009

More Artwork!

Just over a week to go until our next college weekend and I am happy to report that I have completed my artwork for assessment! Now, this is a big thing for me because usually I do my stitching homework and leave the artwork until the last minute.


This is a sponge print based on one of the plates from my personal theme. The pattern on the plate is called 'Aztec' and comes from 1966. I think it looks quite modern.

This is a drawing done with watercolour pencils based on the sugar bowl in the photo. I have also included a photo of the backstamp which I think is lovely. Ascot comes from 1964.

Sunday, 8 November 2009

Artwork - scraffito and string prints.

The Research for Design module requires us to put together a portfolio of artwork based on our personal theme. My personal theme is 1960s pottery and so far I have used three pieces of pottery made by J & G Meakin.

The first piece of artwork is a string print of a leaf taken from one of my pieces. I printed it using acrylic paint and then coloured the leaves and the background with drawing ink.

The second sample is scraffito again based on a design on one of my pieces of pottery. The crosses were done in wax crayon and then I washed over the whole page with brown ink. Then I went over just the crosses in black ink. The crosses were then scratched back to reveal the wax crayon underneath.
Here are the photos of the two pieces of pottery used as inspiration.


Monday, 19 October 2009

Two samples made into mini quilts.

I have just completed my second weekend at college and have come home with lots of new samples to work on and I even did quite a lot of artwork!!
Before I start to show them I wanted to complete my posting of samples from the first weekend.
To remind you most of the work was done using automatic embroidery stitches on the sewing machine. My personal theme is 1960s pottery and I have used two plates to inspire the two mini quilts. The photos are a visual guide on how I went from plate to quilt - there is more detail on how I made them on my other blog.


This quilt is free motion quilted using the automatic stitch.


This quilt uses the automatic stitch to embellish the stars over the sheer fabric. It is then quilted with a straight stitch around the stars.

Saturday, 17 October 2009

Ann's Samples

Today we have been at college. It has been lovely to meet up with everyone again and to celebrate Rachel's significant birthday with yummy chocolate cake.
The following photos have been taken to help us work on our samples for next month. They have all been made by our teacher Ann who has generously agreed to allow me to share her work with you. Ann is very generous in sharing her knowledge, books and materials and has done loads of samples with materials that change when heated. Thanks Ann!


This is a sample using automatic stitches.
A montage using Ann's personal theme of fossils and minerals.

A collage.


Sample using fibretex.

Sample using tyvek - this was made by sewing the tyvek into a circular tucked pattern before heating.


A sample with kunin felt background. The ammonite is covered with irise film.
Sample with goldtex, apparently 'teabag foil' works just as well!
Sample with xpandaprint.
Sample with lutradur.